Community Eligibility Provision
The Community Eligibility Provision (CEP) allows eligible schools to provide meal service to all students at no charge, regardless of economic status. The CEP uses direct certification data and does not rely on annual household applications that have been used in the past to determine free and reduced-priced lunches availability.
Once the site or district has been approved for CEP status by the state, the user can use this option to allow all students that are status 2, 3, and 4 to eat free and be counted as an “all group” or status 2 students. This will only be able to run/process once per site, per meal, per day and is not available offline.
How to Set up, Serve and Process Community Eligibility Provison
When a district has a site(s) that become CEP eligible, follow these steps:
STEP ONE—Set up a CEP Site (to be completed by an Administrator):
-
Go to Administration: District Settings: Site Setup: Site Details Tab—If the site participates in the Community Eligibility Provision program, select CEP from the Alternate Provision dropdown list.
-
Go to Administration: District Settings: Served Item Setup—create a new item with the correct meal prices. Statuses 2, 3 and 4 should all have a price of $0.00.
-
Go to Administration: District Settings: CEP Setup—Set up the Identified Students % for each CEP site.
Example: You can use CEP Breakfast/CEP Lunch for all statuses—just ensure statuses 2, 3 and 4 have no price and the other statuses have the correct meal price entered in their fields. Since CEP only applies to student statuses, the teacher/adult/food server worker statuses will be charged correctly.
STEP TWO: Serve CEP Meals (usually completed by a Cashier)
There are two options for processing CEP meals—By Student and Bulk Processing.
-
By Student: Serve students and others individually through the Serve: Point of Sale screen using the correct CEP item code.
- OR, Bulk Processing: Serve students and others all at once through the Serve: Point of Sale screen by using a clicker or any method to count the overall total participation on any given day for each meal served.
Count the number of students getting a meal on a day so you can enter a total participation on the screen in Step THREE.
Enter the Total Participation (number of meals served) in the appropriate field on the screen in Step THREE.
THEN,
-
Return to the Serve: Community Eligibility Provision form to process the participation. The program will automatically apply the percentages to calculate the number of Free and Paid meals to be claimed.
-
Free = Identified Students % * Multiplier * Total Participation (always round up to the next nearest integer)
-
Paid = Total Participation – Free
-
STEP THREE: Process CEP Meals (usually completed by Cafeteria Manager)

-
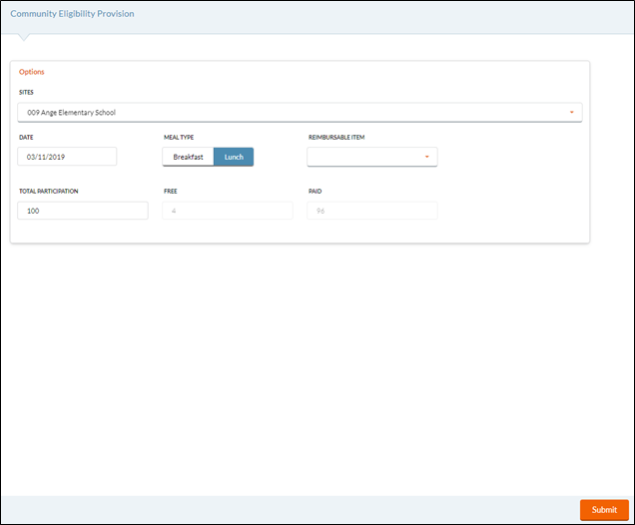
Select a CEP site from the Site dropdown list.
-
Select the serving date from the Serving Date field using the calendar feature.
-
Select Breakfast or Lunch for the Meal Type.
-
Select the Reimbursable Item served from the Reimbursable Item dropdown list.
-
If you have multiple items served (i.e. Reimbursable Meal and Salad Bar), you can select either one before processing. The calculation is based on total number of students eating, not what they are eating.
-
-
The Total Participation will automatically appear if you served by student, or enter the Total Participation if you served by Bulk Processing.
-
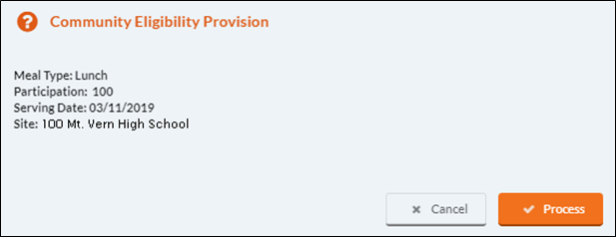
Click Submit. A process screen will display; this is when the total numbers are calculated.

-
Verify the information is correct, especially the Participation number, and click Process.
-
A message displays once the processing is complete. This step must be done for each meal at each site.
-
If a meal and site have already been processed, a message will display saying that it has been processed.
-
Entering Transactions by Student vs. Bulk Processing
There are two options for processing CEP meals—By Student and Bulk Processing.
Each site needs to be set to CEP in Site Setup, and the CEP Setup percentages must be entered.
-
With By Student, you serve the students individually through the serving line (or Serve By Teacher), using a nutrition code 1 meal that has prices all set to zero. (If there are any reimbursable meals served with a non-zero price, you will get an error message and they will need to be voided in order to process CEP.)
-
Then, you go to the Serve: CEP screen. It shows the total number of reimbursable meals served and calculates the number of Free and Paid based on CEP settings. When you save, it resets the meals to give the correct Free and Reduced counts for CEP reimbursement.
-
This option gives a record of which students were served; however, the meal status could be different from the student status.
-
Example: if 300 meals were served and the CEP settings are Identified Students 60%, Multiplier 1.6: it will reset 96% of the meals to Free status and the rest will be set to Paid status. The first 288 transactions will be set to free and the rest will be paid for reimbursement purposes. It doesn't matter what each individual student's status was at the time the meals were served.
-
-
You can re-run CEP processing if meal counts or CEP percentages need to be corrected, as long as the daily deposit is not closed.
-
For generic accounts, it converts meal transactions to ~CEP meals. if you need to make corrections, follow the steps under Bulk Processing.
-
For individual student meals, it recalculates the transaction status based on the CEP setup percentages.
-
If a la carte sales are served along with a CEP reimbursable meal, the transaction will be split into two separate transactions (one transaction for the CEP reimbursable meal and another transaction for the remaining items).
-
-
With Bulk Processing, you do not enter any reimbursable meals through the serving line. You just enter the total number of meals served under CEP and it creates free and paid transactions using Generic Accounts (200, 300, 400).
-
This is the faster method if you just need to calculate the Free/Paid count based on the total.
-
Enter the Participation Count for this meal. If you enter a Participation Count that is higher than the Membership, it will give a warning.
-
It will calculate and display the allowable number of Free and Paid meals based on the CEP settings for the selected site.
-
On Submit, it will create one generic transaction for Free meals and one for Paid (if applicable) using the selected Item code; the item description will be preceded with '~CEP'.
-
It will give an error on Submit if CEP processing has already been run.
-
If corrections need to be made, use the following steps:
-
Go to the serving screen and Void any existing ~CEP meals for the Site/Day/Meal.
-
Re-enter the same number of meals that were voided using Generic Accounts (200, 300, 400).
-
Make any corrections that are required.
-
Re-run CEP processing.
-
When reimbursable meals are served to a Generic Account (200, 300, 400) at a CEP school, those meals will be automatically voided and re-entered at the appropriate statuses when this Community Eligibility Provision utility is run. The re-entered meals will be under the 200 and/or 400 Generic Accounts and the item description will be labeled with ~CEP.
-
To avoid having meals voided and re-entered automatically at CEP schools, please use actual student accounts instead of Generic Accounts.
-
-
-
You can also make corrections in Modify Daily Deposit.
-
-
CEP With primary Sites and Secondary Sites
-
Primary and Secondary sites are processed separately for CEP.
-
If there is a Secondary site, Generic Accounts are not recommended for reimbursable meals because all generic meals go to the Primary site.
©2021 EMS LINQ Inc.
Meals Plus Web Help, 10/2019